
HO gauge diesels abound.
Here is how Bruce installed DCC decoders in some popular models.
April 7, 2006
Athearn Genesis HO SD70MAC Sound Parts List
- 678-885024 SoundTraxx Tsunami2 DCC sound decoder with EMD2 sounds
[2020 update] - SP-16x35-04, Qty = 2 of 16 x 35 mm speaker 4 ohms
- Nano-Oil 5, 10 & 85 wt
- Never Stall
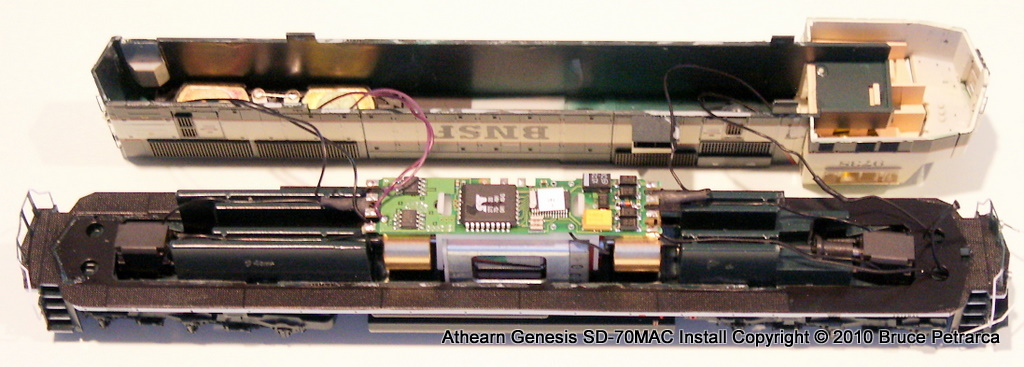
This great looking and running loco can sound good, too.
The Atlas style light board is replaced with the Soundtraxx decoder. Now that the Tsunamis2 is available in the Atlas light board version, that is what is shown in the parts list. This photo has the circa 2006 LC-series decoder in it. The Tsunami2 will look a bit different, but the installation is virtually identical.
This unit has room enough for two speakers to fire out through the top grilles, so Bruce used two 16 x 35 4-ohm speakers in series.
As of the reposting of this on his site in 2020, Bruce recommends replacing the 1.5v bulbs with 0603 LEDs and resistors.
Feb 28, 2013
Atlas HO C424 Sound Parts List
- 678-828045 SoundTraxx Tsunami DCC sound decoder
[2020 note, use Tsunami2, part number 678-885014.] - SP-16x35-08 16 x 35 mm speaker 8 ohms
- Wire2951 29AWG super flexible wire (2 ft)
- Clear caulk
- Nano-Oil 5, 10 & 85 wt
- Never Stall
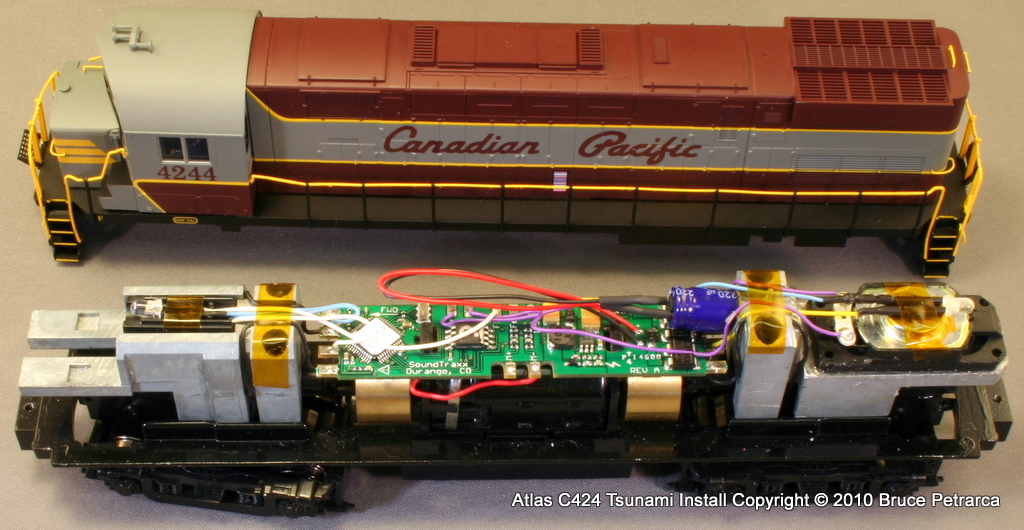
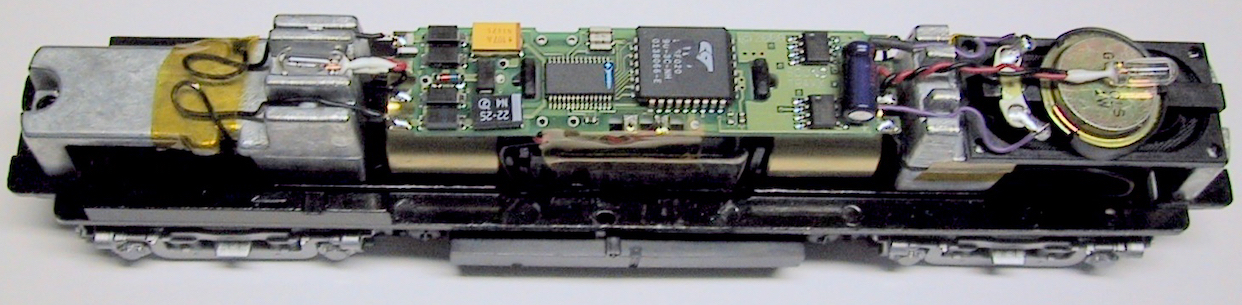
This is an easy install once you remove some of the height on the weight.
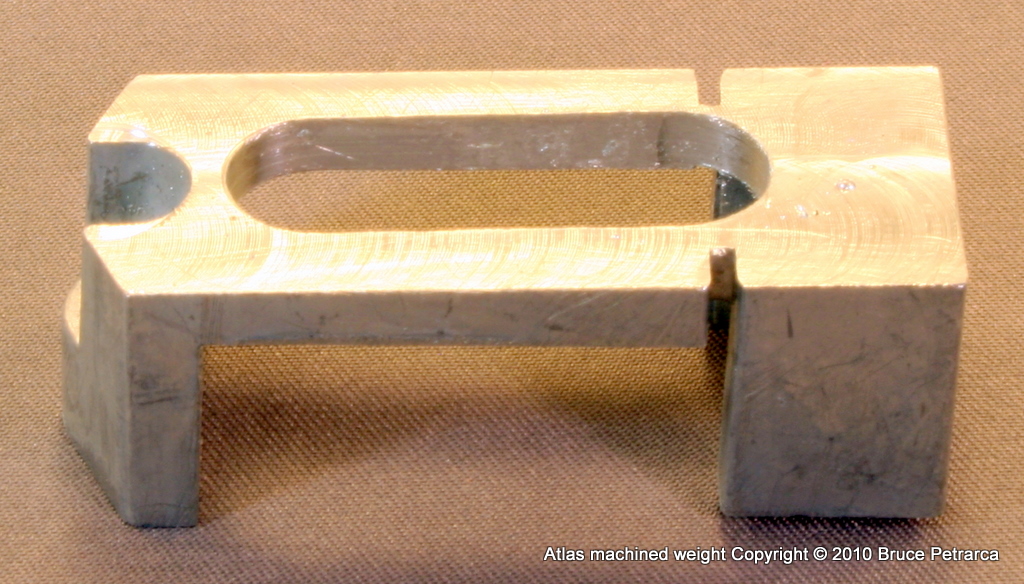
Prepare the rear weight by reducing its height by about 0.3 inches and opening a hole for the air to pass from the speaker cone to the area above the rear truck. This can be done with a belt sander and a hand drill or with a milling machine. Here is a photo of a unit milled to the desired configuration.
Enlarge the two holes in the speaker (the side where the terminals are) to allow the weight mounting screws to pass.
Screw the weight back into the loco with the speaker on top as shown.
Use a bit of caulk to seal the speaker to the weight. Be careful to keep the caulk off the speaker cone or surround.
Install the decoder. Bruce recommends replacing the wires from the trucks to the decoder with the Wire2951 shown in the parts list for long term reliability. The external capacitor was secured at the end of the decoder as shown above.
Mar 16, 2009
Atlas HO Dash8-40 CW Sound Parts List
- 678-828046 SoundTraxx Tsunami DCC sound decoder
a[2020 note, use Tsunami2, part number 678-885014.] - SP-32R-08 Qty = 2 32 mm speaker 8 ohms
- Clear caulk
- Nano-Oil 5, 10 & 85 wt
- Never Stall
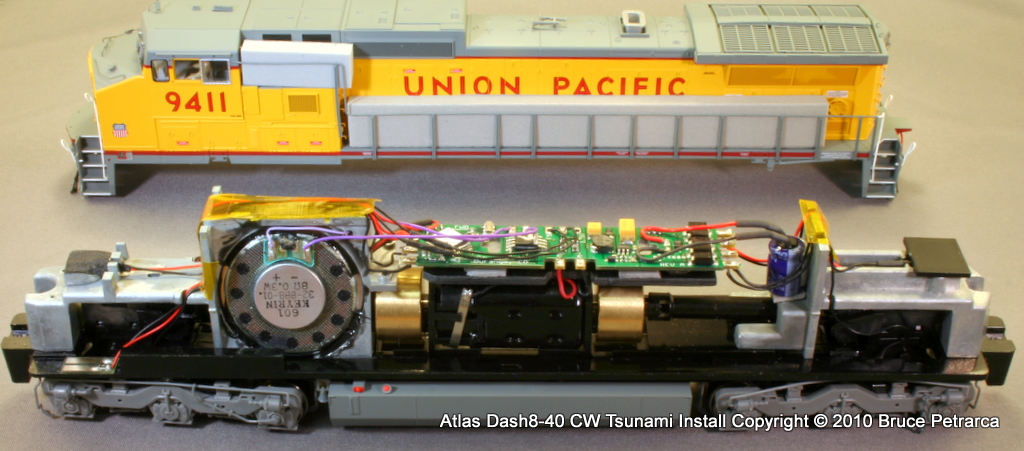
Remove the two plugs in the speaker locations. Install the speakers and wire them in series.Use a bit of caulk to seal the speakers to the weight.Install the decoder. The external capacitor was secured at the end of the decoder as shown above.
Mar 16, 2009
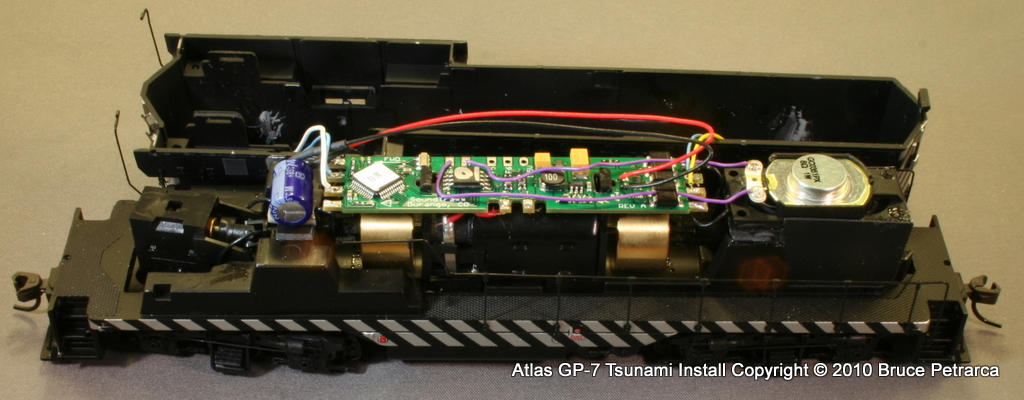
Atlas HO GP7 Sound Parts List
- 678-828040 SoundTraxx Tsunami DCC sound decoder
[2020 update] - SP-16x35-08 16 x 35 mm speaker 8 ohms
- Black styrene sheet 0.02 inch thick
- Clear caulk
- Nano-Oil 5, 10 & 85 wt
- Never Stall
Install the speaker, using plastic to make the "horn" to project the sound down through the rear truck, as shown below.
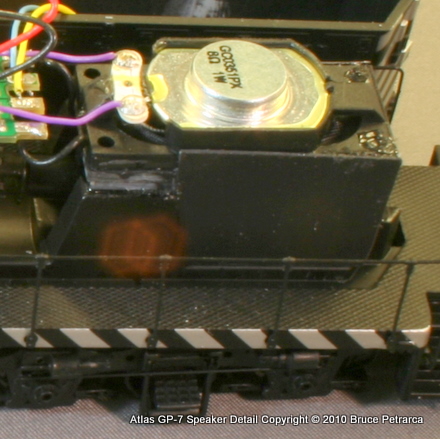
Use a bit of caulk to seal the speaker to the weight and plastic, as shown.
Dec 19, 2008
Atlas HO RS1 Sound Parts List
- 678-828049 HO SoundTraxx DCC sound Tsunami decoder
[2020 note, use the Tusnami2, part number 678-885015.] - LED-5SW Qty = 2 LED 5 mm Sunny White
- R-820-1/8W Qty = 2 Resistor metal-film 820 ohm 1/8 watt
- SP-16x35-08 Speaker Rectangular 16 x 35 mm (5/8 x 1.4 inch) 8 mm (0.32 inch) deep 8 Ohms
- Wire 30AWG Blue
- Wire 30AWGYellow
- Wire 30AWGWhite
- Wire 30AWGViolet
- 269-9513 Styrene black sheet 6 x 12 inches x 0.02 thick
- 272-1704922 Faller Expert Styrene Cement
- Nano-Oil 5, 10 & 85 wt
- Never Stall
- Gray Foam Tape
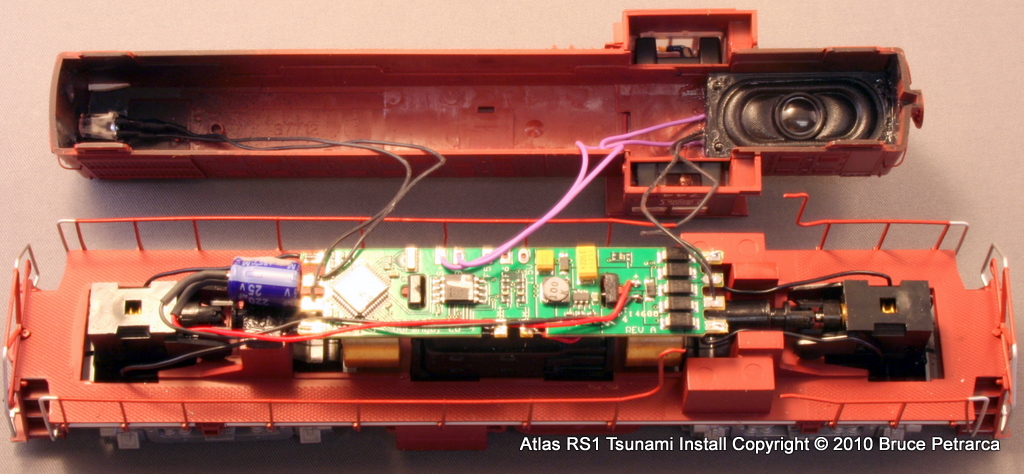
BASIC INSTALLATION: The Tsunami was snapped in place of the removed Atlas Light Board with the Forward direction on the decoder matching the F on the loco (long hood in this case). A small styrene mounting sheet was installed between the bosses on the weight over the front drive train. It was bent slightly to increase clearance against the hood. The capacitor was affixed to this plate with foam tape. The motor and rail power were wired to the decoder. The loco was tested for proper directional operation.
LIGHTING: To make room for the install, we removed the light pipes from the shell and mounted Sunny White LEDs in place of the light pipes. A resistor was installed in one lead of each LED and the LED and resistor pigtailed with color coded wire (blue to Anode - long LED lead - through resistor; white or yellow to the other LED lead). Shrink tubing was used to insulate the connections. The LED was held in a set of clamping tweezers in a vice pointing up. Faller Expert Styrene cement was applied to the shell and the shell positioned over the LED with gravity holding alignment. When one LED was dry, the other was cemented. This removes the light supply to the number boards, which was pretty weak to start with. Additional surface mount LEDs could be used on the number boards, but the complexity exceeds the result in Bruce’s opinion.
SPEAKER: A pair of violet wires were attached to a 16 x 35 mm speaker. It was mounted in the shell below the LED on the short hood. An enclosure was made by putting 0.02 inch thich styrene between the speaker and the sides of the shell. The wires for the LED and speaker were routed along the top of the hood toward the middle of the loco. The open end (near the cab) was covered with 0.04 inch thick styrene - or use two pieces of 0.02 thick!
FINISH: The LEDs were wired to the connections on the ends of the boards, observing correct polarity. The speaker was wired to its terminals. The Lubrication was applied as needed. The decoder was programmed and the shell snapped back in place.
Jan 21, 2010
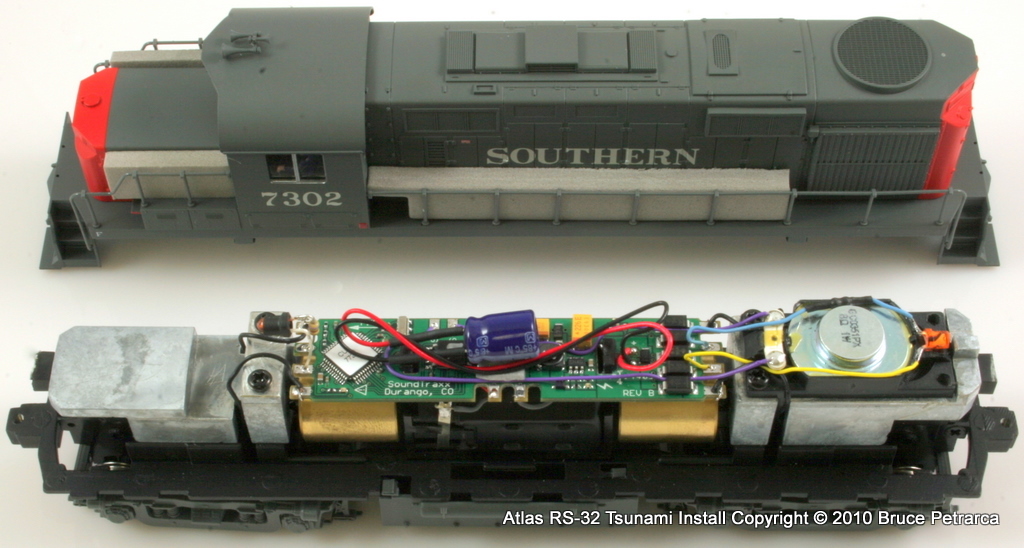
Atlas HO RS32 Sound Parts List
- 678-828044 SoundTraxx Tsunami DCC sound decoder
[2020 note, use Tsunami2, part number 678-885015.] - SP-16x35-08 16 x 35 mm speaker 8 ohms
- Wire2951 29AWG super flexible wire (2 ft)
- Clear caulk
- Nano-Oil 5, 10 & 85 wt
- Never Stall
This is an easy install once you remove some of the height on the weight.
Prepare the rear weight by reducing its height by about 0.3 inches and opening a hole for the air to pass from the speaker cone to the area above the rear truck. This can be done with a belt sander and a hand drill or with a milling machine. Here is a photo of a unit milled to the desired configuration.
Enlarge the two holes in the speaker (the side where the terminals are) to allow the weight mounting screws to pass.
Screw the weight back into the loco with the speaker on top as shown.
Use a bit of caulk to seal the speaker to the weight
Install the decoder. Bruce recommends replacing the wires from the trucks to the decoder with the Wire2951 shown in the parts list for long term reliability. The external capacitor was secured at the end of the decoder as shown above.
Jul 26, 2014
Atlas HO S2 Sound Parts List
- SoundTraxx TSU-750 Select ALCO 539 - Turbo for S2 or S4; Non-Turbo for S1 or S3
- LED-3GW Golden White LEDs (2)
- R-750-1/8W 750 ohm resistors (2)
- Kapton Tape 1/2 inch wide
- Shrink Tubing 1/16 inch 1 yard
- Nano-Oil 5, 10 & 85 wt
- Never Stall
- Carpet Tape
- Rectangular Speaker SP-16x35-08
- Connector set 1-pin - male & female TEN PACK - Only 2 needed!
- Brass sheet
- Arctic Alumina Thermal Adhesive
- Bathtub Caulk
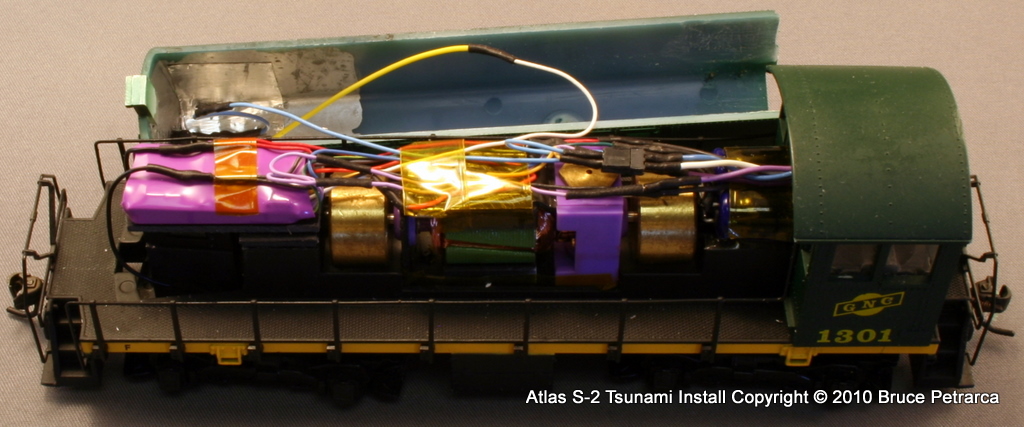
These are very popular little switchers, available in S-1, S-2, S-3 and S-4 versions for various roads. NCE has made a custom decoder (ATL-S4) for them without sound for quite a while, but they were discontinued about 2010. Until now, folks looking for sound were limited to the MRC 1663. With the release of the Micro Tsunami, another option is available. SoundTraxx has now released the 539 sounds (S-1 and S-3) and the 539 Turbo sounds (S-2 and S-4). I LOVE the turbo sound! The newer generation Tsunami2 decoders will probably work similarly, but I haven't done one.
A loco that had been using the NCE ATL-S4 decoder was retrofitted with the sound decoder. as shown here. This install is putting 5-1/2 pounds of stuff in a 5 pound bag - not for the feint of heart.
Sunny white LEDs were mounted to the shell with their resistors wired in series. These days, I’d use the 3 mm 12 volt warm white LEDs - no resistor needed. Opaque (metal foil) tape was used inside the nose of the loco to prevent light leakage.
The speaker was mounted in the cab with the cone facing toward the truck and adjusted as far down as it could be without interference with the truck throughout its entire range of motion. The speaker and LED wires were brought out and black styrene used to enclose the speaker rear area.
Initially (when this photo was taken) the Tsunami was mounted to a piece of black styrene. In operation, after about an hour, the loco would start to show signs of thermal shutdown. The fix was to build a shelf with brass that was raised up on pieces of brass over the front truck - an upside down U assembly was built to clear the drive line. This brass assembly was held to the frame with silver epoxy to maximize heat transfer. The Micro Tsunami was held down to the brass sheet with bathtub caulk. After this modification, the loco was operated 8 - 10 hours a day for two weeks without any indication of overheating. The nose of the shell was warm to the touch.
Later, I found Arctic Alumina Thermal Adhesive to be a better choice than silver epoxy. Less expensive ($6 vs $40) and not electrically conductive, so more forgiving. Since it is not electrically conductive, I would use it, instead of caulk, to hold the decoder to the brass shelf. I purchased my Arctic Alumina Thermal Epoxy through Amazon.com.
Aug 16, 2008
Atlas HO SD35 Sound Parts List
- 678-827101 Tsunami DCC Sound Decoder by SoundTraxx
[2020 note, use Tsunami2, part number 678-885022.] - 30 mm (1.17 inch) Round Speaker 1 watt rated Qty = 2
- 269-9515 Styrene Black 0.04 thick
- Shrink Tubing 1/16 inch 1 yard
- Kapton Tape 3/8 inch wide one yard
- Bathtub Caulk
- Gray Foam Tape
- Nano-Oil 5, 10 & 85 wt
- Never Stall
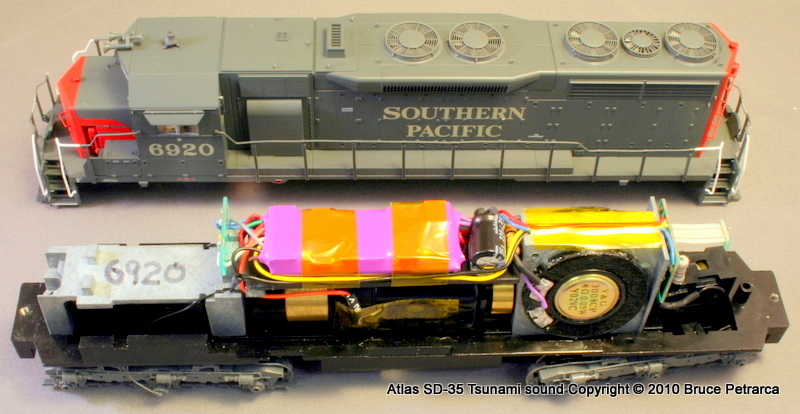
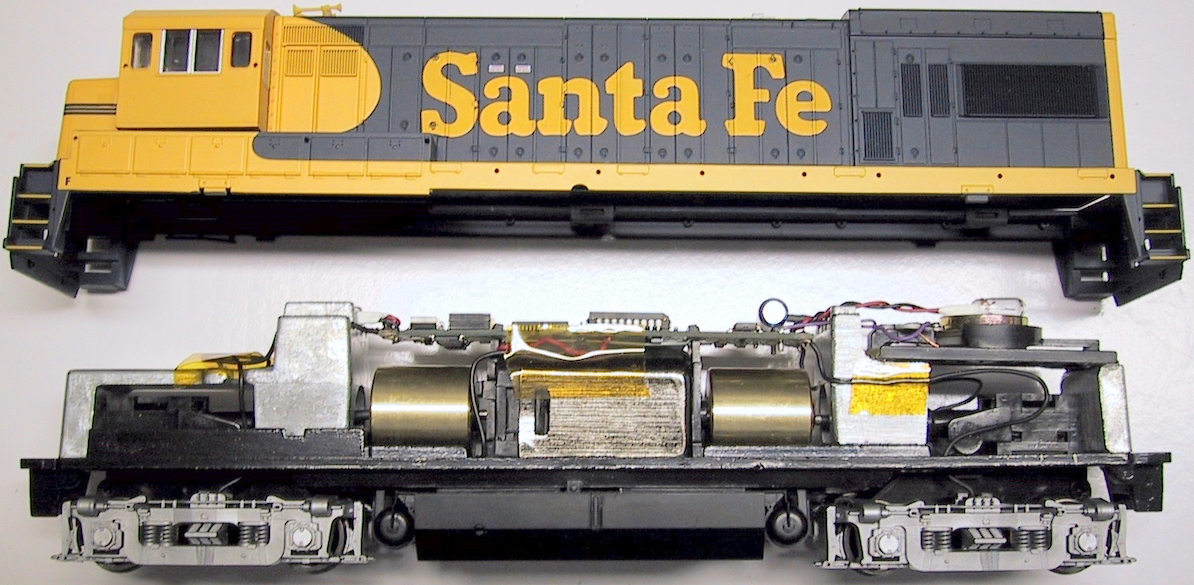
This loco was designed for sound. If you bought one without sound, here is the easy way to give it a voice!
The photos show the older speaker only rated at 0.05 watts. Bruce used one resistor between the speakers to wire them in series. Since this installation was done, higher wattage rated speakers have become available and are shown in the parts list, above. Use the higher wattage speakers without the resistor.
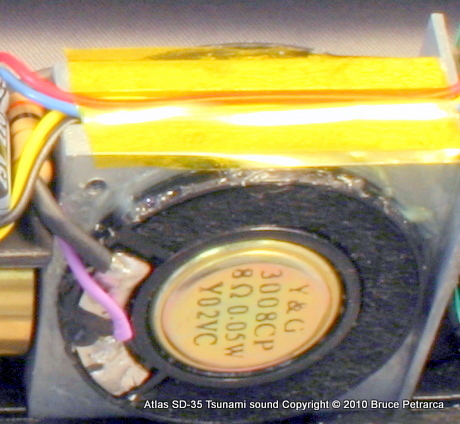
The two speakers were held into the mounts with bathtub caulk. Be very careful not to get it on the speaker cones. All seems fine sound wise on this install. Remember the shell is an integral part of the acoustic design of this installation. The sound will change (improve) when the shell is installed. These speakers are a bit thicker than the ones that the loco was designed for, you MAY need (or want) to trim a bit of the shell for a good fit.
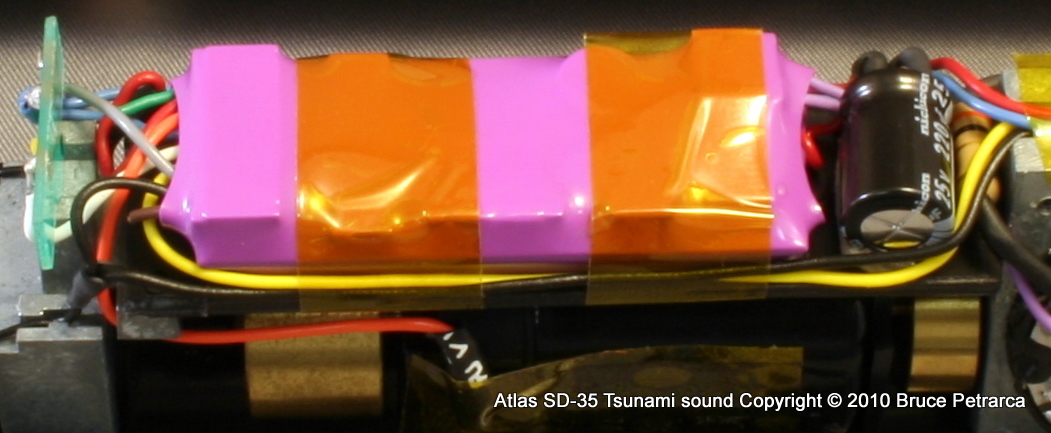
The diesel Tsunami decoder fits between the weights. We removed the Atlas board and installed a styrene shelf using double sided tape. The diesel Tsunami was mounted on this board along with its capacitor (with the leads shortened). The pick-ups, LEDs and motor were wired with the leads from the decoder with the majority of Atlas' wires being discarded. Kapton tape holds the wires in place.
Feb 28, 2005
Atlas HO U23B Sound Parts List
- 678-885014 Tsunami2 DCC sound decoder
- SP-16x35-08 Speaker
- 269-9513 Styrene black sheet 6 x 12 inches x 0.02 thick
- Nano-Oil 5, 10 & 85 wt
- Never Stall
After several different setups, Bruce has finally settled on this as the quickest, best sounding installation for these popular locos.
These photo graphs were of a mid-era installation by Bruce. He had found the easy way to do this loco utilizing the DSD-100LC series decoders that were the mainstay of SoundTraxx at the time.
Later they were replaced with the Tsunami TSU1000AT series of decoders. As of 2020, the decoder of choice would be the TSU-PNP Tsunami2 board.
Physically they are all similar, but read the instructions for connection information. There are differences.
Also, these days, Bruce would replace the bulbs with LEDs. There is a nice 3mm 12V LED that can directly replace the bulbs. Unlike the bulbs, the LEDs are polarity sensitive, so check the polarity of your decoder and connect the anode (+) terminal of the LED to the +12V or BLUE terminal on the decoder.
The speaker enclosure is created through the shell of the locomotive. The speaker is glued to the rear weight and supported in the very back with a piece of styrene. The positive pressure (sound waves coming off the cone of the speaker) get routed out the rear truck area. The negative pressure (sound waves coming off the magnet side of the speaker) get routed above the decoder and out the front truck area.
The decoder board installs in place of the Atlas light board.
Jan 23, 2009
Kato HO AC4400CW Sound Parts List
- 678-828046 TSU-AT1000 Tsunami DCC decoder for GE FDL16
[2020 note, use Tsunami2, part number 678-885014.] - SP-28R-08 Speaker
- Resistor metal-film 1K ohm 1/8 watt Qty = 2
- Washer #6 Nylon Qty = 2
- Nano-Oil 5, 10 & 85 wt
- Never Stall
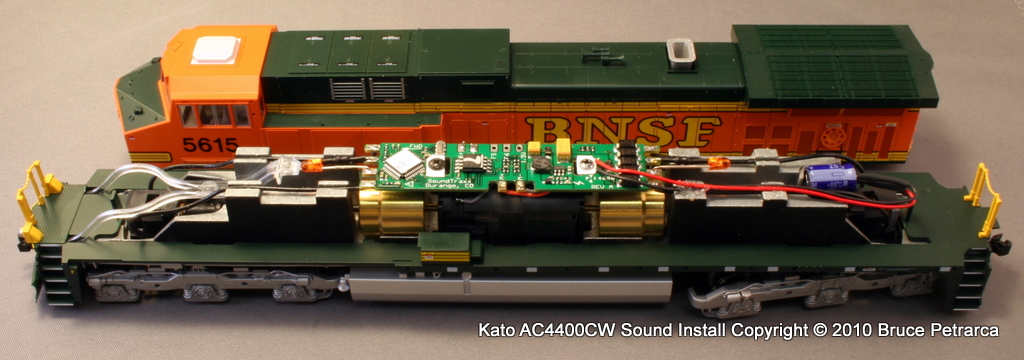
The release of the TSU-AT1000 decoder allowed an update to the installation examples to cover this decoder.
This is a fairly straight forward installation:
Remove the factory light board
Remove the factory LEDs from the factory light board
Install the factory LEDs with 1 K ohm resistors on the Tsunami
Screw the Tsunami down to the motor - insulate with nylon screws (the photo shows white styrene instead)
Put the speaker in the fuel tank and rout wires up to the decoder
Wire the track pick ups and the motor to the decoder
Sound Quality - While the speaker enclosure mechanism is NOT what Bruce would design, it works just FINE! Not to worry - follow the directions. Except, Bruce sees no reason for using a gasket - the speaker snaps into the Kato enclosure. Question - why didn’t Kato mold holes for the speaker wires into the enclosure?
Lighting - When programming the Tsunami, set the light type to LEDs and you are golden (white LEDs)!
September 22, 2012
Kato HO NW2 Sound Parts List
- DECODER SoundTraxx TSU-GN1000 678-828050
- SPEAKER & ENCLOSURE Railmaster Hobbies DS1425-8
- REAR LED Richmond Controls 3mm Golden White LED
- FRONT LED Richmond Controls SMD Golden White LED with 6 inch leads
- RESISTORS two each 750 ohm 1/8 watt
- Cab floor replacement, if needed Styrene about 1 inch by 1 inch, 0.020 inch thick
- TRUCK WIRES Super flexible 29 AWG rubber insulated wire (Wire-2951)
- MOTOR AND REAR LIGHT WIRES 30 AWG wire from TCS: orange, gray, yellow, blue
- Black panty hose, see column, don’t just steal your wife’s
- Kapton tape 3/8 inch wide & 1/4-inch wide
- Blue painters tape
- Styrene cement
- Formula 560 Canopy Glue
- Gray Krylon primer spray paint
- Denatured alcohol or Ethyl rubbing alcohol
- Nano-Oil 5, 10 & 85 wt
- Never Stall
This installation is the subject of my January 2013 column in Model Railroad Hobbyist magazine. CLICK HERE to view that column.
A video of this installation is available from Model Railroad Hobbyist magazine: CLICK HERE. In addition to the specifics of this installation, this video provides a comprehensive look at basic methodologies for DCC conversion of many different types of locomotives. A sample of the video is here:
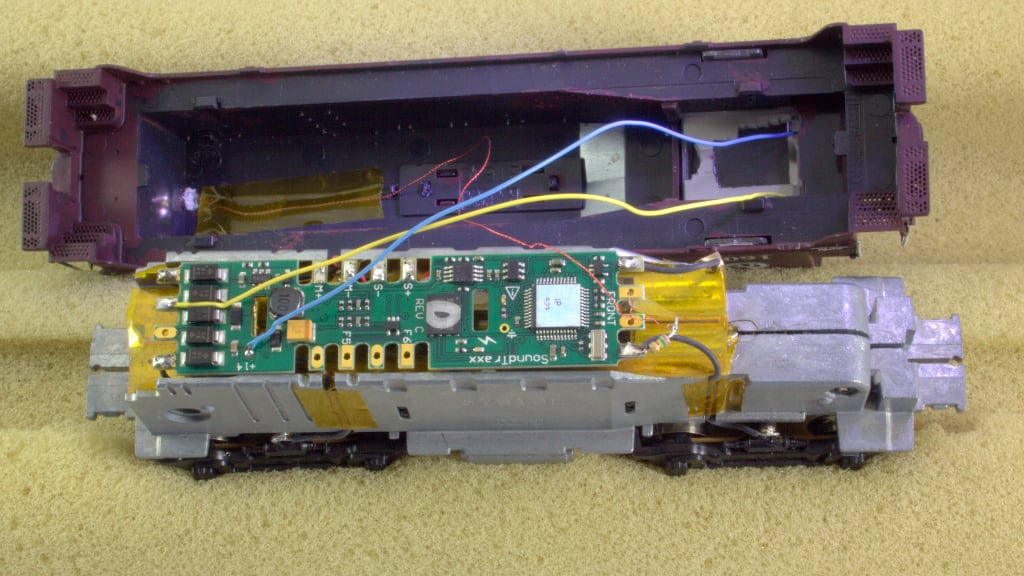
Machining the frame is pretty straight forward. Remove enough from the top to clear the decoder and enough from the fuel tank to clear the speaker. Then machine four slots on each side to bring the wires up.
As you can see in the photo above, the rear light is wired to the front of the decoder and vice-versa. The decoder MUST be installed backwards (front end facing the rear). Below the rear of the decoder are two large electrolytic capacitors. They would interfere with the motor if the decoder were installed in the normal direction. I chose to cross wire the lights, wiring them to the intended terminals, not the closest ones. This avoids having to reprogram the function outputs.
Here is the locomotive ready to move the shell down onto the frame. It shows the wiring to the trucks and the speaker (which is mounted in the fuel tank).
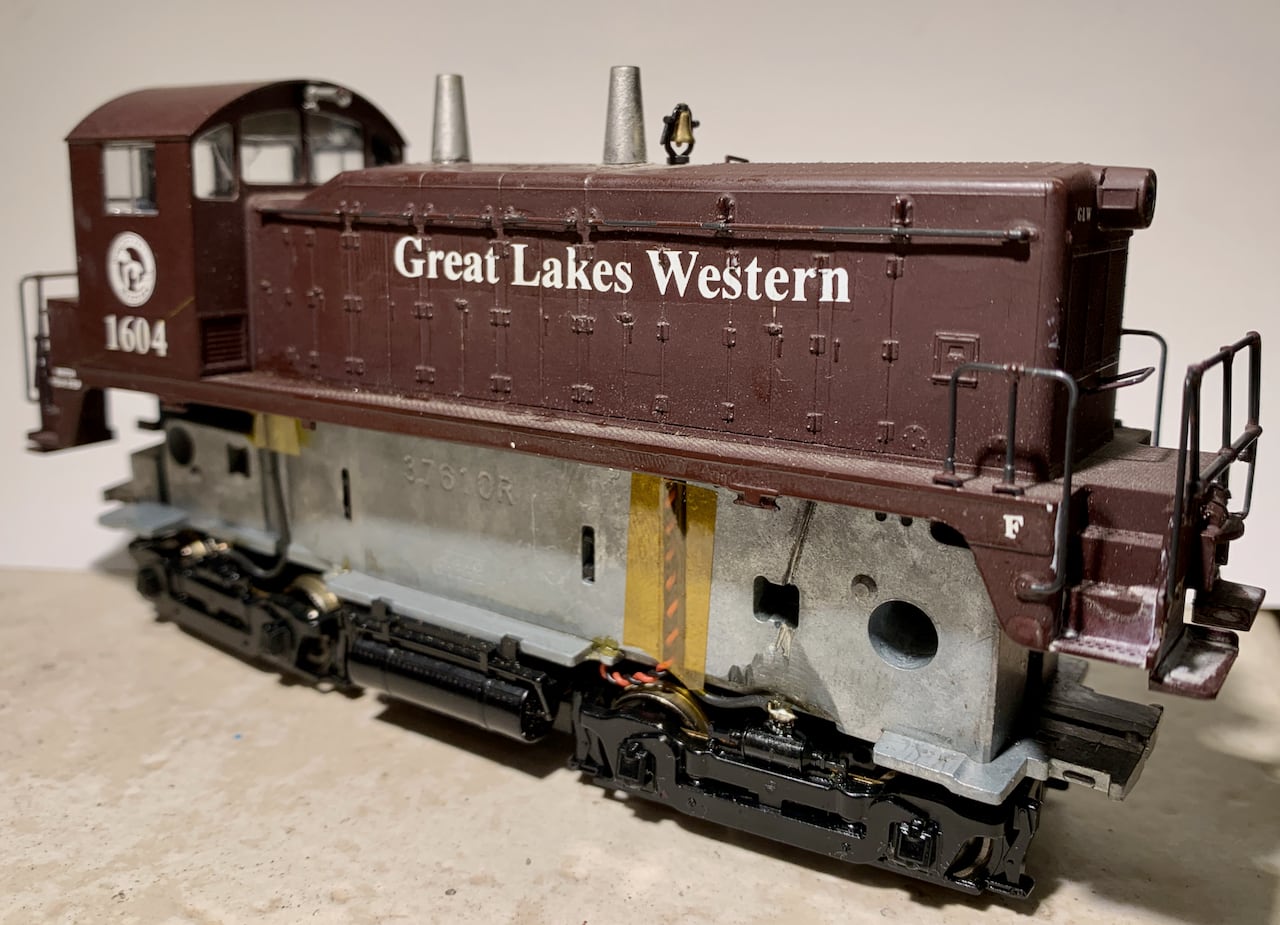
Aug 1, 2008
The Proto 2000 GP9 and SD9 locos are virtually identical inside. So, if you are working with an SD9, check out the GP9 of the same vintage.
This installation was done in 2008 using the QSI Revolution decoder. An "Atlas light board" decoder from any manufacturer will work in this version of the decoder installation.
The locomotive was disassembled. An end-milling machine was used to cut the weight down to level right at the highest point on the motor. Absent a mill, a belt sander can be used carefully to remove the metal.
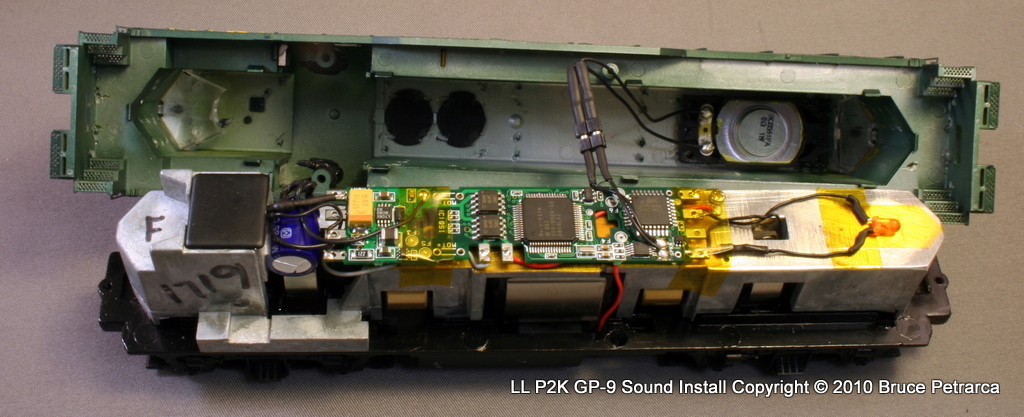
The black plastic covers were removed from behind the two rear most fan grilles. The rear light pipe was removed and cut down to clear the speaker. A drop of Faller Expert styrene cement on the machined end of the light pipe gets rid of the scratches quicker than all the polishing you can imagine!
The speaker was installed in the shell and connected to the two-pin connector MALE side.The speaker was sealed to the shell with bathtub caulk.
The decoder was installed with the LEDs wired with the anode to one rail and returned to the function pad with a 750 ohm series resistor. If the decoder you selected has an eternal capacitor, it can be secured above the front truck with double sided tape.
For those of you who have attended Bruce's clinics on "How do I get the sound out?" will recognize the technique: The positive pressure goes out the grilles and the negative pressure gets routed mostly to the front truck. Here is a detailed photo of the speaker mount.
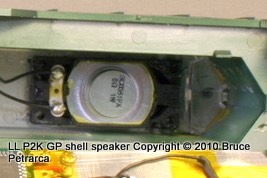
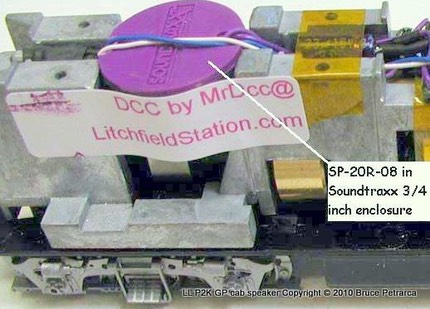
An alternative speaker mount is shown below, with a speaker and enclosure combination replacing the cab details. While this is a more conventional mount, the sound quality is SIGNIFICANTLY POORER than with the grille mount shown above.
HO gauge steam locomotives
Here are some ideas on how to install decoders into them.
June 26, 2010
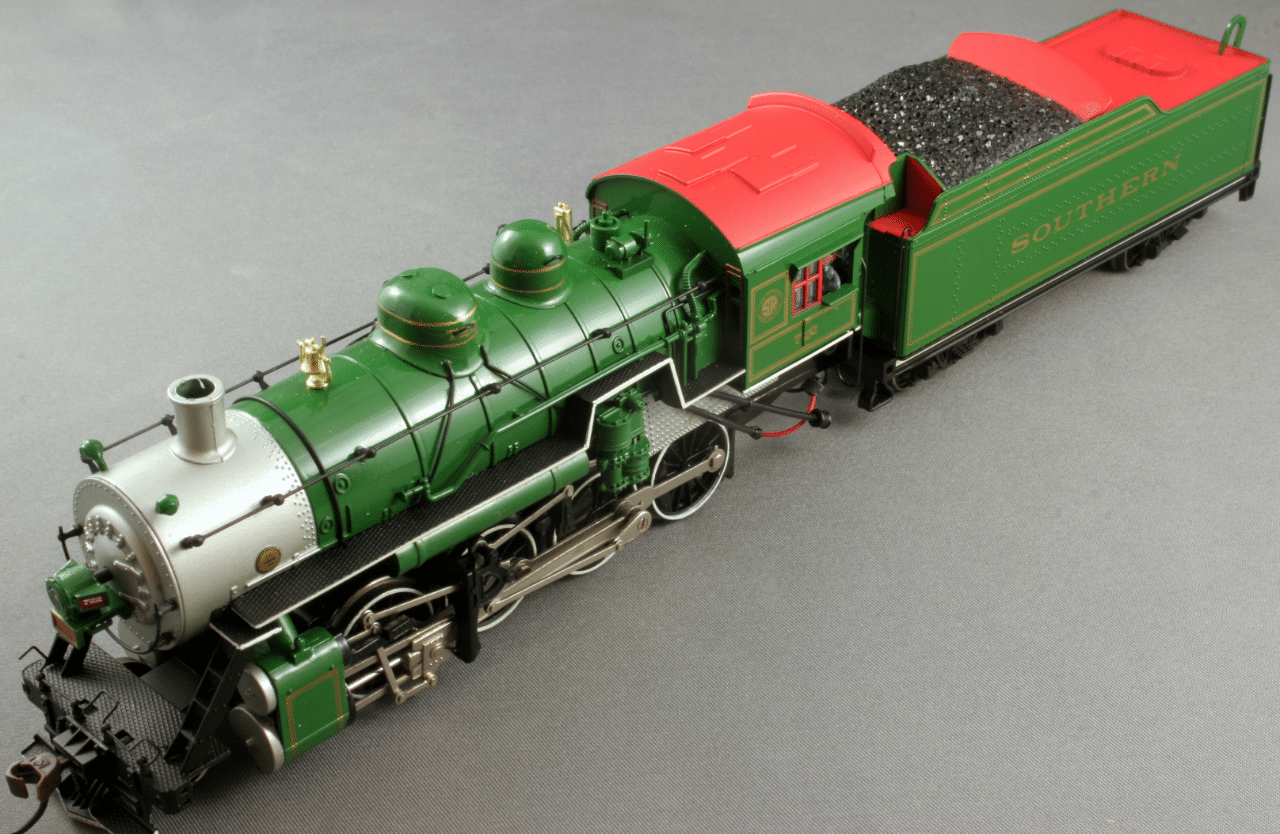
Bachmann Consolidation 2-8-0 Sound Parts List
- Medium or Southern Steam HO DCC decoder sound by SoundTraxx TSU-1000
- Speaker 28 x 40 mm rectangular 8 Ohms
- Kapton Tape 1/2 inch wide
- Shrink tubing in various sizes: 3/32, 1/8, 3/16, 1/4 inch
- Nano-Oil 5, 10 & 85 wt
- Never Stall
This discussion revolves around the older Spectrum series units. The newer (non-Spectrum) units have a NEM-652 (8-pin) socket in the tender and a cutout for a 28 mm round speaker. Use a Digitrax DHWHP harness or TCS MH harness to replace the harness on your Tsunami.
If you have one of the (older, better) Spectrum units, read on.
The tender of the Consolidation looks as if it were designed with a 28 x 40 mm speaker in mind. A minor bit of plastic shaving and piece of plastic and you are styling!
Be aware that there are several tenders out there for the Consolidation. This tender is about 4 inches long. The shorter (about 3-1/2 inch long) tender will need the SP-28R-08 speaker, but the rest of the install is the same.
The Bachmann Light Mountain loco uses this same tender for the most part. The internal Printed Circuit Board is different. However, if you are removing the board, as Bruce recommends, the installation is the same.
The coal load was perforated with a #70 drill to allow the sound out the top. Some coal loads will require a bit of material removal to clear the speaker frame. Drill about 200 holes from the INSIDE of the coal load toward the outside. This photo is a view of the coal load with about 200 #70 holes drilled randomly in the coal load. Can you see the holes? Don't think so!
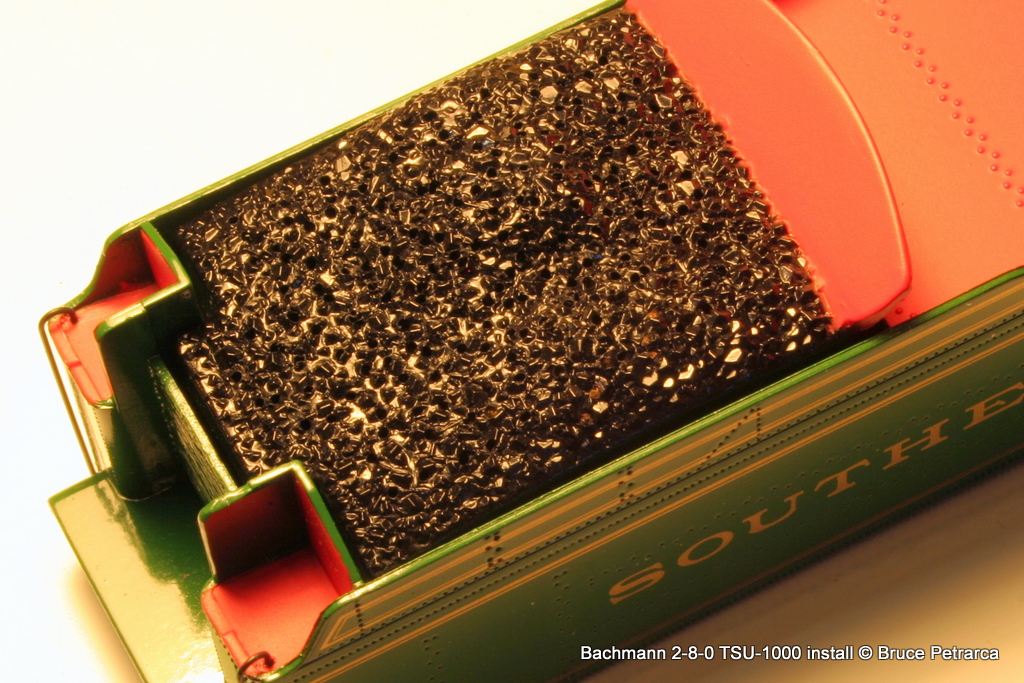
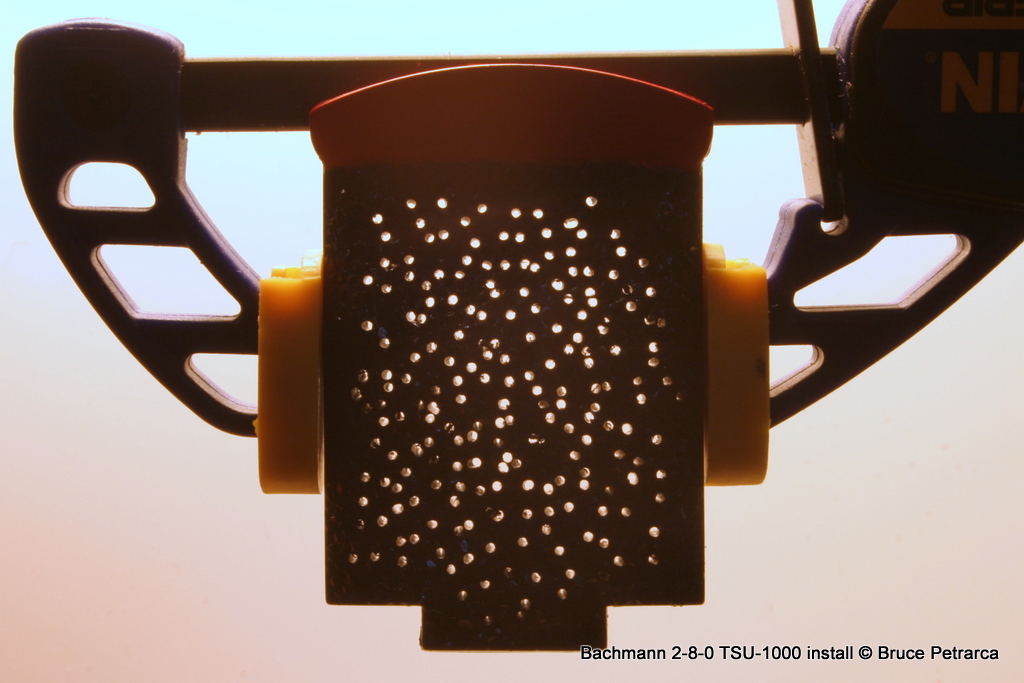
However, with the light behind the coal load, you can see the acoustic path from the speaker to your ears.
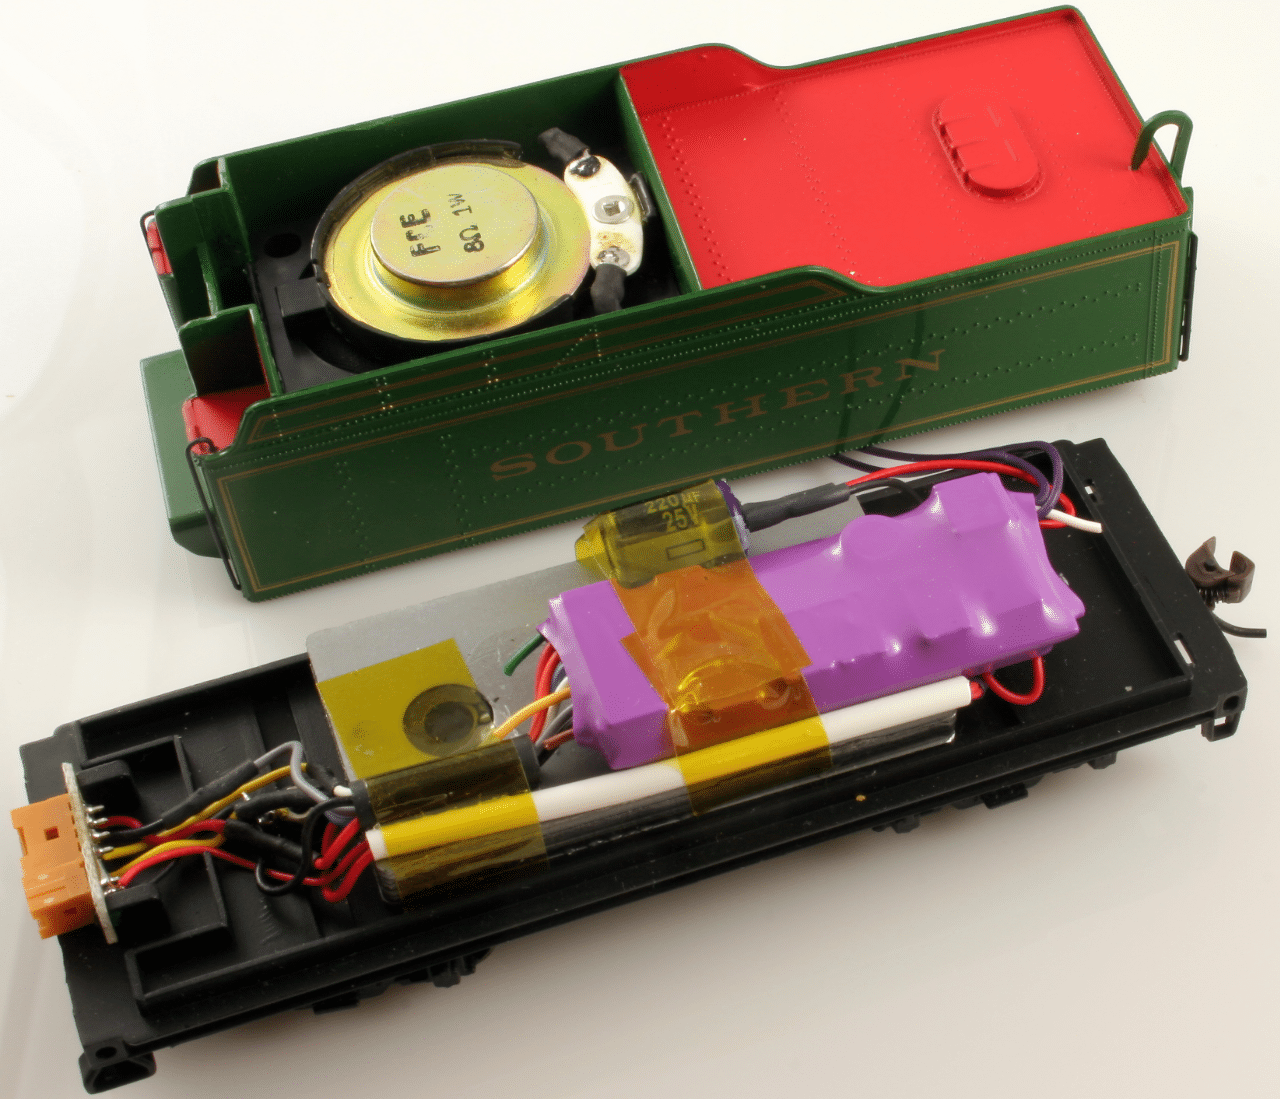
The SP-28x40 mounts on the shelf as shown in the photo. Enlarge the opening below the speaker as much as possible but keeping the front sealed from the rear. A 5/8 x 5/8 piece of plastic runs down the inside front of the tender to complete the seal.
Note: the magnet assembly of the speaker holds the coal load up just a bit. If you are a perfectionist, plan to use the rear slide plate (red in this install) and then put mesh and loose coal over the speaker, being careful not to get glue or coal into the speaker).
Speaker Mounting
Yes, the speaker is mounted with the magnet up! Sound comes out both sides of a speaker. The sound coming off the magnet side of the speaker goes out through the coal load. The sound coming off the other side of the speaker goes into the shell - which acts as an enclosure.
Bruce removed the Bachmann board and wired the Tsunami directly to the rail power, motor and headlight connections. Removing the Bachmann board provides room for the Tsunami mounting, leaving the mounting boss in place, so the shell can be screwed to the tender floor. A rear light could easily have been added at this time.
Here is a detailed shot of the connector area.
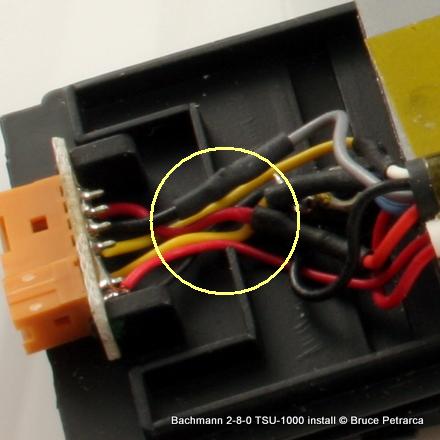
When reassembling the tender make certain that the Kapton tape is not covering the screw hole for the shell. Also, be sure that the wires are constrained between the bosses on the tender floor, as shown in the photo above. If the wires are outside the bosses, the top tender shell will pinch wires and, perhaps, even cut them.